What Really Happens During a Roof Replacement: Step-by-Step Guide
Getting a new roof is a big deal for any homeowner. Whether you're planning a full replacement or weighing repair options, knowing what to expect can really help. It can make those contractor proposals less confusing and prepare you for the project's timeline and costs. Let’s walk through the major phases of a roof replacement, talk about best practices, and even touch on some of the latest trends like sustainability and drone inspections. Plus, we’ll answer some common questions homeowners often have.
Introduction: Why Knowing the Process Matters
What this guide will teach you
We’re going to break down the whole roof replacement process—from the first inspection to the last bit of cleanup. You'll be able to see what professional workmanship looks like, ask informed questions, and protect your investment. We’ll cover material choices, safety, permits, and even care tips after the installation. If you’re thinking about a full roofing installation, this guide will give you the confidence to compare bids and set reasonable expectations.
How a clear process reduces surprises
When contractors follow a clear, documented process, things tend to go more smoothly. It cuts down on expensive rework, keeps everyone safe, and makes managing timelines and budgets easier. Plus, having a clear process helps with getting permits and passing inspections, so you won't run into any compliance issues down the line.
Local considerations and codes
Local building codes and climate can really influence your roofing decisions—from the type of underlayment to the details in flashing. In places like Oregon, you’ll need permits and final inspections. For detailed code requirements, check out the Oregon Building Codes Division. Knowing the rules ahead of time can help you avoid delays and fines.
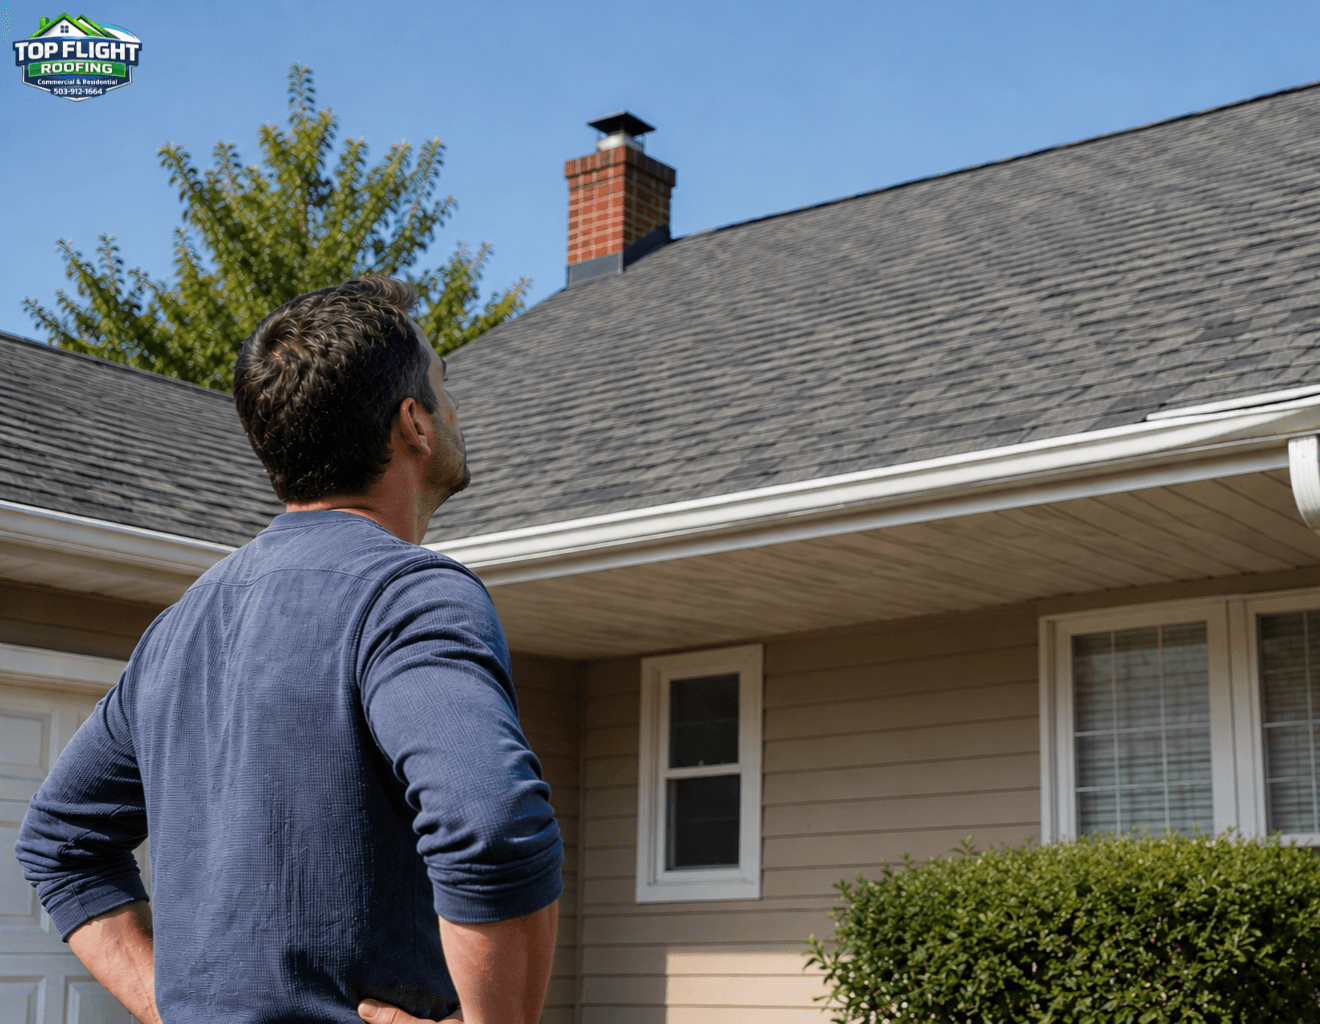
1. Initial Assessment and Preparation
Inspection: a careful, systematic evaluation
Every roof replacement kicks off with a thorough inspection. A qualified inspector or contractor will check out the current roof condition, look for signs of water intrusion, inspect flashings and penetrations, and evaluate structural elements like rafters and decking. This inspection usually includes both a rooftop walk (when it’s safe) and a ground-level look to spot shingle wear, moss, algae growth, and gutter blockages that might signal drainage problems.
Inspectors document their findings with photos and notes to create a scope of work. A documented inspection helps you compare quotes fairly and ensures that bids account for hidden conditions, like rotten decking or poor ventilation.
Material selection: balancing life span, budget, and aesthetics
Picking the right materials is important. Asphalt shingles are popular because they’re cost-effective and easy to install, while metal, slate, and tile last longer but come with higher upfront costs. Sustainable or "cool" roofing options improve energy efficiency by reflecting solar heat, which can lower cooling costs. Consider appearance, expected lifespan, maintenance needs, and local weather when choosing materials.
Professional contractors can show you samples, compare life-cycle costs, and discuss warranties to help you pick the best option for your home. If energy efficiency is a priority, ask about reflective coatings and upgraded underlayment along with proper insulation like our roofing insulation options.
Permits and regulations: paperwork before work
Most roof replacements need permits. A good contractor will help you get these permits and make sure everything complies with local building codes, flashing details, and ventilation requirements. Permit fees, inspection timelines, and documentation needs vary by city and county, so make sure you leave time in your schedule for approvals. Proper permitting protects your property value and ensures the installation qualifies for manufacturer warranties and insurance claims.
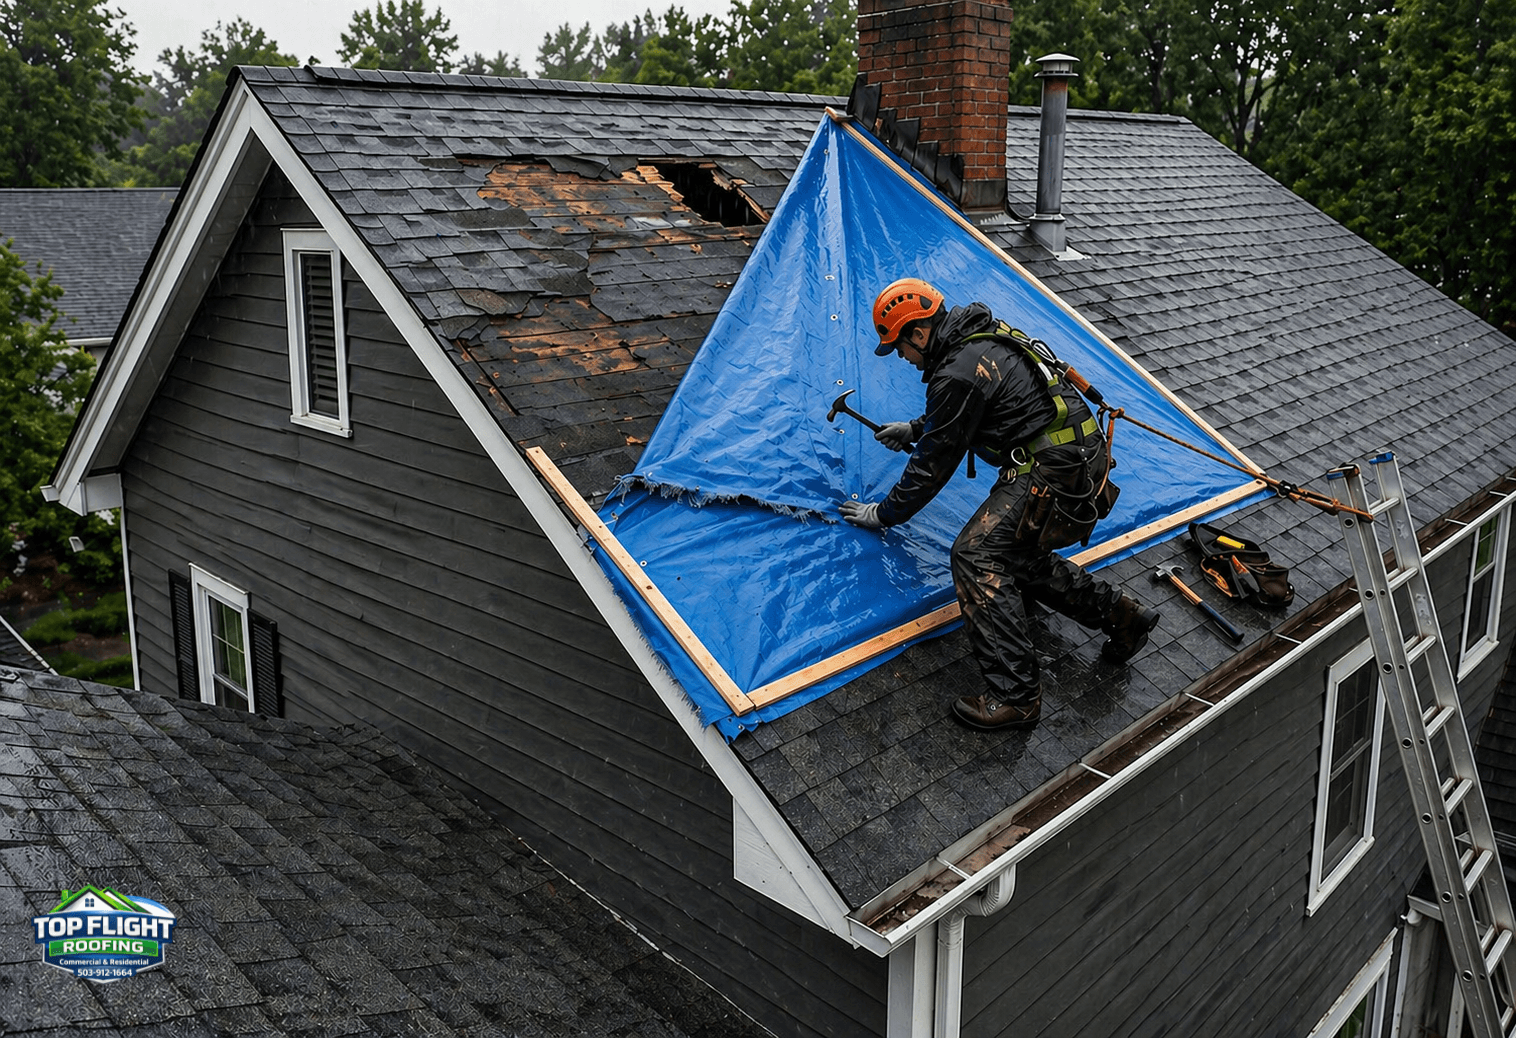
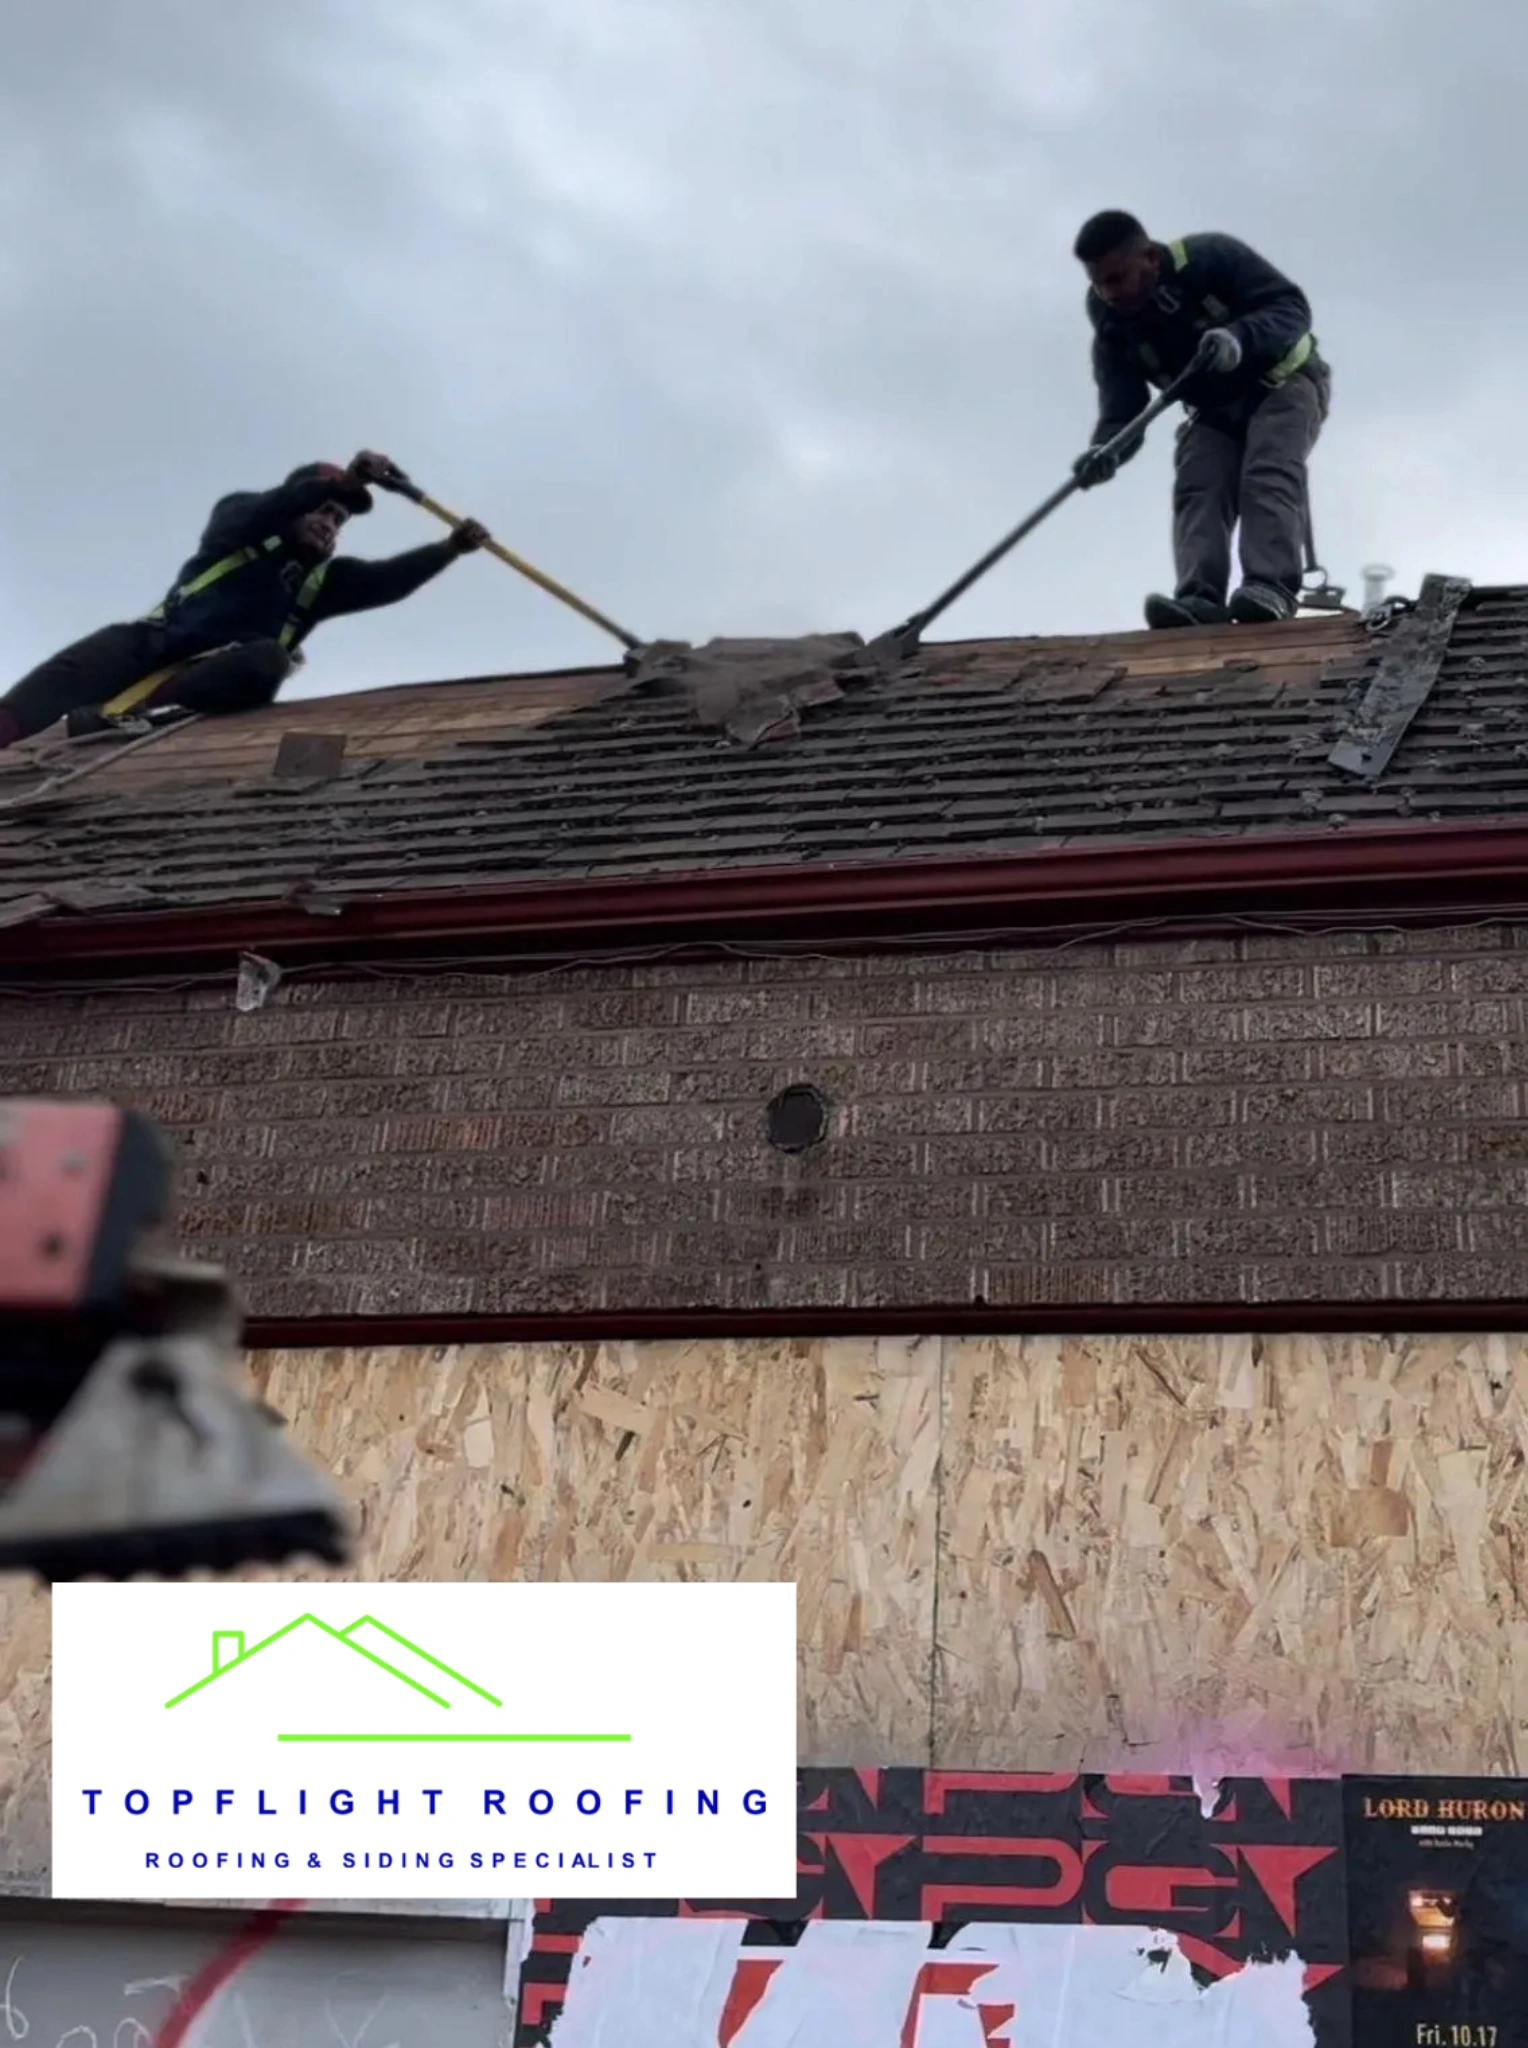
2. Removal of Existing Roofing
Tear-off: why and how installers remove old materials
A full tear-off gets rid of old shingles, underlayment, and any damaged decking down to the roof deck. This is usually the way to go when roofs are layered, when there’s lots of damage, or when you’re switching roof systems (like going from shingles to metal). Removing old materials lets installers thoroughly inspect the deck and flashing and prevents hidden rot from being trapped under new layers.
Tear-off crews work in coordinated teams, using tools like stompers and shingle rakes. They protect your landscaping and property with tarps and boards and use efficient methods like roofing bins and chutes to safely move debris off the roof.
Debris management: cleanliness and safety
Good contractors keep the worksite clean and safe. They collect debris in covered containers or dumpster bins and remove it promptly. Nails are magnet-swept from yards and driveways to protect family members and pets. Managing debris efficiently reduces trip hazards and speeds up cleanup at the end of the project.
When comparing bids, check if waste disposal and site protection are included in the quote. Hidden costs can pop up when debris removal is treated as an add-on.
Safety protocols during tear-off
Roofing work can be dangerous. Proper fall protection, harnesses, guardrails, and ladder safety help reduce injury risk. Crew members should follow OSHA guidelines, and the contractor should have liability and worker’s compensation insurance. Ask potential contractors about their safety plan and training protocols before hiring them.
3. Roof Deck Inspection and Repair
Structural evaluation: what inspectors look for
Once the deck is exposed, contractors evaluate its structural soundness. Inspectors look for soft spots, rot, water stains, and damaged rafters or trusses. Even small areas of rot can compromise the roof’s ability to hold fasteners and can lead to long-term leaks if left unaddressed. Accurate assessment determines whether partial decking replacements or more extensive structural repairs are required.
Inspectors also check attic ventilation and insulation since inadequate ventilation can accelerate roof material deterioration and trap moisture that damages the deck from below.
Repairs: replacing or reinforcing decking
Repair options range from patching small areas of damaged sheathing to replacing entire roof decking sections. Proper repair involves removing rotten decking, installing new sheathing panels, and using corrosion-resistant fasteners. Contractors ensure new decking ties into existing structure with appropriate blocking or nailing patterns to meet code and manufacturer requirements.
If carpentry or framing adjustments are needed, a contractor with strong carpentry skills will make those corrections. For specialized carpentry work, you can lean on services like our professional carpentry services to ensure the deck is restored to a structurally sound condition.
Common hidden issues and how they’re handled
Hidden problems like ice dam damage, wildlife intrusion, or previous poor repairs can surface during deck inspection. Experienced contractors account for contingency work in estimates and communicate unexpected findings promptly. Documented change orders and clear pricing keep the project transparent when additional repairs are required.
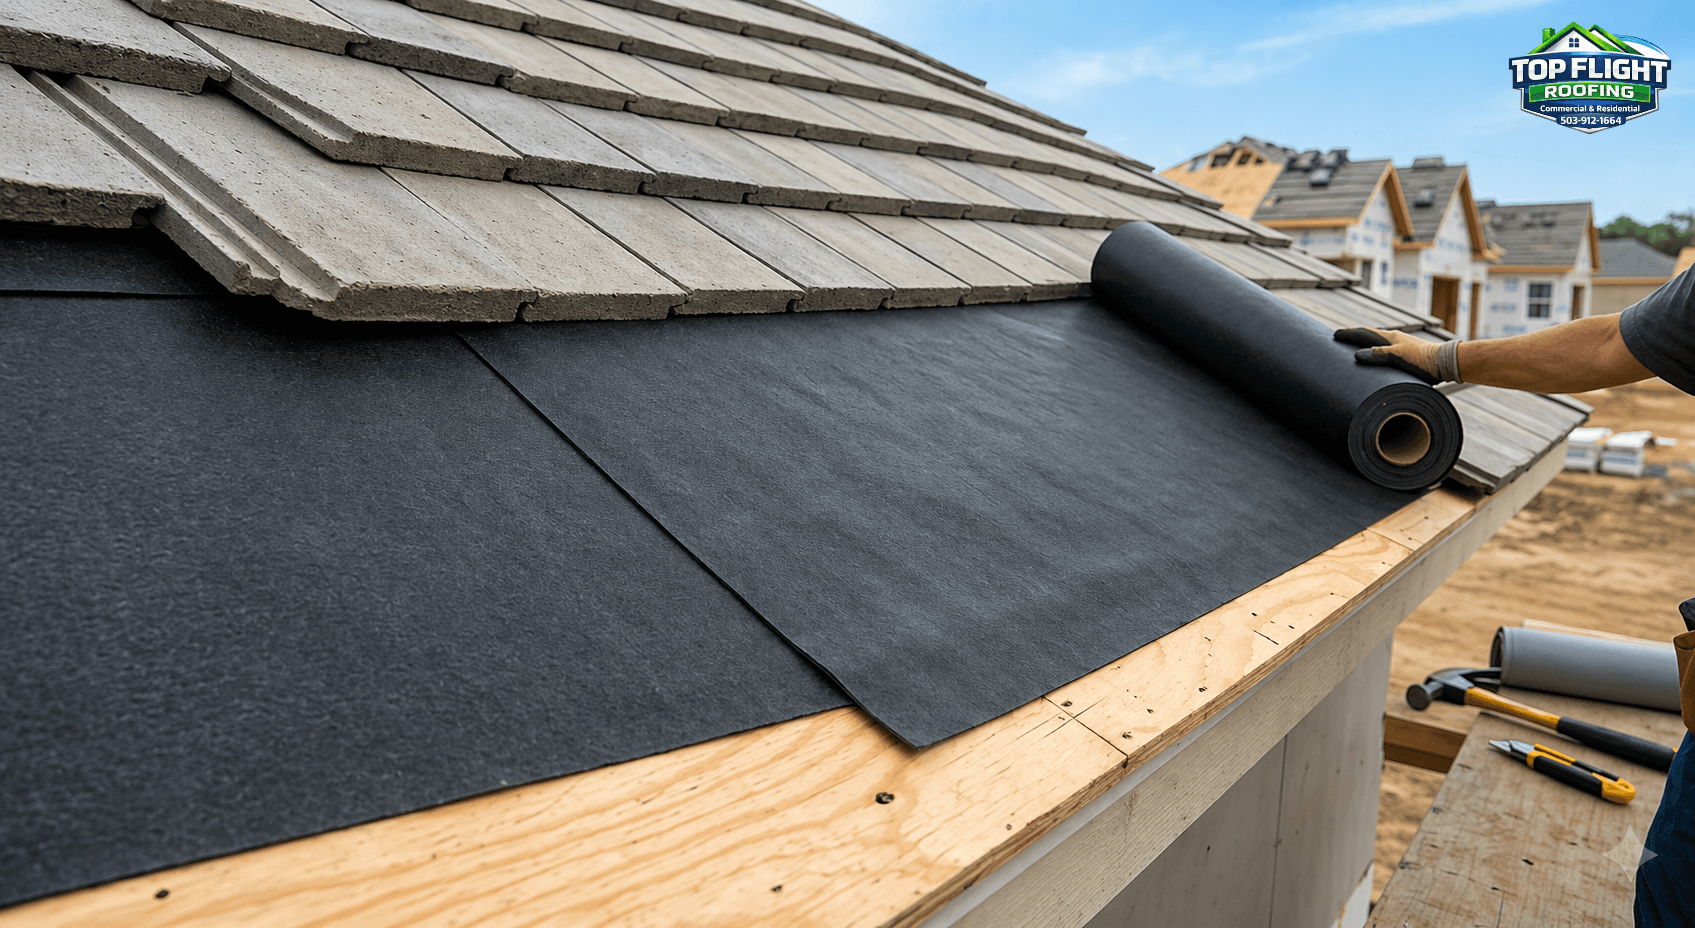
4. Installation of Underlayment and Flashing
Underlayment types and installation best practices
Underlayment acts as a secondary water barrier. Traditional felt paper and synthetic underlayments are common; synthetic products often provide superior tear resistance and water-shedding performance. For vulnerable areas like eaves, valleys, and rakes, manufacturers recommend self-adhered ice-and-water barriers to prevent water infiltration during freeze-thaw cycles.
Correct underlayment installation includes proper overlap, fastening patterns, and sealing at transitions. Inadequate underlayment installation is a frequent source of leaks, so confirm that your contractor follows manufacturer instructions and local code requirements.
Flashing: the invisible leak-preventer
Flashing is critical where the roof meets chimneys, skylights, vents, and wall intersections. Flashing materials—usually metal such as aluminum or galvanized steel—are shaped and sealed to channel water away from vulnerable seams. Proper step flashing at wall intersections, counter flashing at chimneys, and sealed penetration collars at vents dramatically reduce leak risk.
Flashing workmanship is a major differentiator between average and high-quality installations. During contract review, ask about metal gauge, seam treatments, and the sealing materials used for penetrations.
Moisture management and ventilation considerations
Underlayment and flashing work together with attic ventilation to control moisture. A balanced ventilation system (soffit intake and ridge exhaust) prevents condensation, reduces attic heat buildup, and extends shingle life. The U.S. Department of Energy details how ventilation contributes to energy-efficient roof assemblies and attic performance: Energy.gov — Ventilation & Air Sealing.
Properly designed ventilation and moisture control are particularly important in rainy climates where trapped moisture can lead to mold and rot.
5. Roofing Material Installation
Shingle application: methods and quality checks
For asphalt shingles, installers follow a manufacturer-prescribed nailing pattern, alignment guidelines, and starter strip installation. Shingles are aligned in courses to maintain consistent exposure and ensure water runoff follows predetermined channels. Proper nailing (correct length and placement) prevents blow-offs and premature failure, while adequate starter strips and ridge cap installation finish the system for wind resistance.
Installers should verify fastener placement, adhesive activation (for sealant strips), and shingle straightness during the install. Quality checks are done continually to ensure consistent workmanship across the roof plane.
Alternative roofing options: metal, slate, and eco-friendly materials
Metal roofing installation requires different fasteners, underlayment, and flashing strategies. Metal panels must account for thermal expansion and secure attachment without distorting panels. Slate and tile systems are heavier and typically require reinforced roof framing and specialized installation techniques. Sustainable roofing choices—including recycled-content shingles, cool roof coatings, and living roof systems—are growing in popularity as homeowners prioritize energy savings and environmental impact.
If you’re exploring specialized materials, ask the contractor for examples of past work, relevant warranties, and how they handle manufacturer-specific installation requirements.
Ventilation: ridge, soffit, and powered systems
Ventilation is installed alongside roofing materials and includes ridge vents, soffit vents, gable vents, and sometimes powered attic fans. Ridge and soffit systems provide continuous air movement when sized correctly. Proper ventilation prevents moisture accumulation and can contribute to a cooler home in summer months. For energy-focused installations, integrating ventilation with improved roofing insulation delivers compounded energy benefits.
6. Final Inspection, Cleanup, and Documentation
Quality check: what a final inspection covers
After installation, a thorough quality inspection verifies flashing integrity, fastener placement, shingle alignment, and ventilation installation. Inspectors also check for manufacturer-required details such as hip and ridge cap attachment, proper starter strips, and sealed penetrations. A signed inspection checklist provides both homeowners and contractors with a clear record that work was completed to specification.
Some manufacturers or local jurisdictions require a final inspection for warranty or permit closure. Keep all documentation, including invoices, permit copies, and warranty certificates, in a safe place for future reference.
Cleanup: nails, debris, and site restoration
Good cleanup includes a thorough magnetic sweep for nails, removal of all packaging, and disposal of debris. Contractors should leave gutters clear and restore any disturbed landscaping. A clean site not only improves safety but also demonstrates the contractor’s attention to detail and professionalism.
Warranty, maintenance plan, and homeowner orientation
Reputable contractors provide written warranty details that outline coverage terms and maintenance responsibilities. Manufacturer warranties and workmanship warranties differ in duration and coverage; ask for both in writing. Contractors should also explain ongoing maintenance—such as periodic inspections, gutter cleaning, and shingle repairs—to prolong roof life and preserve the warranty.
7. Trends, Industry Insights, and Real-World Examples
Sustainability and energy efficiency
Sustainable roofing is becoming mainstream: reflective coatings, recycled shingles, and longer-lasting materials reduce lifecycle environmental impacts. Cooler roofs and improved attic insulation can lower energy usage, particularly in warmer months. The EPA and DOE provide resources on sustainable roofing strategies and the science behind cool roof benefits: EPA — Green Infrastructure & Roofing.
Adopting sustainable materials may qualify homeowners for local incentives or rebates. Ask your contractor for energy-efficiency ratings and potential utility or municipal programs that reward sustainable upgrades.
Technology integration: drones and AI for inspections
Drone-enabled roof inspections and AI-assisted image analysis are becoming common because they increase safety and accuracy. Drones can quickly capture high-resolution imagery of steep, complex roofs and hard-to-reach areas, reducing inspection time and lowering fall risk. AI tools help identify damaged shingles, flashing issues, and storm impacts in photos, enabling faster estimates and better documentation for insurance claims.
When a contractor offers drone inspections, request sample reports. Drone data can be especially valuable for documenting pre-existing conditions for insurance or warranty claims.
Labor market pressures and quality implications
The roofing industry faces labor shortages that challenge scheduling and skilled workmanship. Sourcing experienced crews can reduce installation errors and rework. Contractors investing in training, apprenticeships, and retention typically deliver better outcomes and adherence to safety and quality standards. If a bid seems unusually low, investigate whether the contractor has the workforce and materials to meet the job’s demands.
Case studies: technology and sustainability in practice
In one real-world example, a contractor in Florida used drone inspections to shorten inspection time by roughly a third while improving safety for the crew. Another Pacific Northwest contractor introduced cool roofing materials on several homes, reporting measurable reductions in attic temperatures and improved energy efficiency for homeowners. These local and national examples demonstrate that adopting new tools and greener materials can improve performance and customer satisfaction.
8. Common Questions, Troubleshooting, and Cost Considerations
How long does a roof replacement take?
Timeframes vary by roof size, material, complexity, and weather. Asphalt shingle tear-offs and installations typically take 1–3 days for average single-family homes, while metal, tile, and slate systems can take several days to a week or more. Weather delays, permit wait times, and unexpected repairs to decking can extend timelines. Discuss project scheduling and contingency plans with your contractor before work begins.
What drives the cost of a roof replacement?
Costs depend on material choice, roof size and pitch, complexity of roof geometry, required structural repairs, flashing complexity, and local labor rates. Additional expenses include permit fees, disposal costs, and optional upgrades like insulation or enhanced underlayment. Always request detailed estimates that break down line items so you can compare proposals transparently.
What if leaks appear after replacement?
If leaks are discovered post-installation, notify your contractor immediately and document the problem with photos. Most contractors offer workmanship warranties that require them to address issues arising from their installation. If a manufacturer defect is suspected, the contractor can coordinate a manufacturer warranty claim. Keep records of inspections and maintenance to support warranty claims if necessary.
Insurance and storm damage claims
If the replacement follows storm damage, document the damage thoroughly and communicate with your insurance adjuster. Reputable contractors often assist homeowners in preparing documentation and understanding claim processes. Be careful about contractors who promise quick insurance payouts in exchange for signing over your claim; you should always retain control of your insurance benefits and approvals.
9. Frequently Asked Questions (FAQ)
Can I live in my house during a roof replacement?
Yes — most homeowners remain in their homes during a roof replacement. Expect noise, vibrations, and limited access to certain exterior areas while work is underway. A professional contractor will protect entryways and notify you about expected loud periods. If extensive deck or structural work is required, discuss temporary safety measures with your contractor.
How do I choose a reliable contractor?
Look for licensed contractors with local references, proof of insurance, and a portfolio of recent work. Ask about crew experience, warranty terms, and how they handle unforeseen issues. Verify that the contractor will obtain permits and pass final inspections. Reading local reviews and requesting a written scope of work reduces risk and clarifies expectations.
How often should I schedule inspections after replacement?
Schedule a professional inspection within the first year after installation, and then at least every 2–3 years thereafter, or after major storms. Routine inspections help catch minor issues before they develop into leaks or structural problems. For proactive homeowners, seasonal checks (spring and fall) paired with gutter maintenance keep roofing systems in top condition. For tips on spotting early damage, see our related article: Spotting Roof Damage: A Simple Guide to Save Money on Repairs.
10. Final Checklist and Next Steps
Pre-installation checklist
- Confirm permit acquisition and inspection schedule.
- Review and sign a detailed scope of work and payment schedule.
- Accept material selections in writing and confirm warranty coverage.
- Notify neighbors if work will generate significant noise or access needs.
Installation day checklist
- Secure valuables from attic and exterior walls near work zones.
- Confirm site protection for landscaping and vehicles.
- Request regular progress updates and a point-of-contact for the crew.
Post-installation checklist
- Obtain final inspection reports, permits closed, and warranty documents.
- Review the final walk-through with the contractor and document any concerns.
- Keep records of maintenance and schedule first-year inspection.
If you’d like deeper guidance on repair vs. replacement decisions, read our related piece: Your Easy Guide to Choosing Between Roof Repair or Replacement. For Portland-specific maintenance tips tailored to our wet climate, check out: Preparing Your Roof for Portland's Rainy Season.
Conclusion: Making an Informed Decision
A roof replacement is a complex project, but breaking it down into clear steps—inspection, tear-off, deck repair, underlayment and flashing, material installation, and final inspection—helps homeowners make informed choices and spot quality work. Embracing modern tools like drone inspections and choosing sustainable materials can improve outcomes and long-term value. Labor challenges in the industry stress the importance of selecting experienced, well-managed contractors who invest in training and safety.
If you’re in the Portland area and ready to explore your options, Top Flight Roofing LLC brings over 30 years of local roofing experience and a commitment to clean, detail-oriented installations. We can walk you through material choices, permit requirements, and a realistic timeline for your project. Learn more about our exterior services including siding installation and repair and gutter screening installation to protect your home’s envelope and improve drainage.
For a free consultation and estimate, contact Top Flight Roofing LLC. We’ll assess your roof, explain recommended options, and provide a clear, written proposal that includes permit handling and warranty details. Let our experienced team help you protect your home with a durable, professional roof replacement.
External references and resources cited in this guide include the Oregon Building Codes Division, U.S. Department of Energy guidance on ventilation and air sealing, and EPA resources on green infrastructure and sustainable roofing. For safety standards and best practices, review OSHA roofing guidelines: OSHA Roofing Safety. For climate considerations relevant to roof design and drainage, consult NOAA climate data and resources: NOAA.
Ready to start? Call Top Flight Roofing LLC at (503) 912-1664 or email info@topflightroofingllc.com to schedule your free roof inspection and estimate. Protect your home with expert roofing that’s built to last.